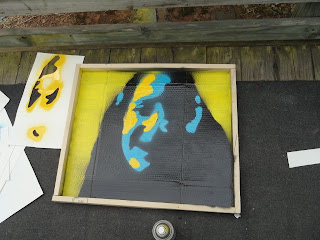
New project, we had to create a stencil and a frame, put them together, and create a portrait. I decided to make my stencil first because everyone else was being noisey and building a frame. It took a couple days to complete but once I did, I moved outside with my friend to build our frames. This was done quickly and easily. Once both the frame and stencil were complete I painted the background of by portrait yellow.
It took a day to dry by once the backgrounds were done I was eager to get outside and spray paint. Of course all I spray painted was my portrait I most definitly did not spray paint anything else. First I layed out my stencil and preped the black paint to spray. In other words a shook a can vigorously for five minutes.
Once the can was ready, I began to paint.
Next was the blue which didn't require much vigorouse shaking. It went down easily and quickly withouth any problems. After blue came yellow which unfortuanetly did not go so smoothly. I sprayed to close to the portrait and then took up the stencil much to soon. The yellow pain spilled out onto the painting where it was not wanted.

I decided to redo the blue so that I could redo the yellow and make it how I wanted. It took quite a while to dry but the effort was worth it, my portrait was done.
By far this has been the most enjoyable project. Partly because we got to go outside and partly because I got to spray paint. Next time I will definitly make less mistakes with spray pain because now I have gathered expierience. I'm looking forward to more fun projects.


Of all the blogs I’ve look at you are one of the only people to capture the entire process and write about it. Your color combinations work well together. I also like how large you created the image so that it extends past the borders .
ReplyDeleteIt is a great website.. The Design looks very good.. Keep working like that!. space paintings
ReplyDelete